Autostereoscopic Display Paper
Two demos of our active autostereo research
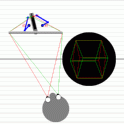

These two demos show how we're making active autostereo displays. In order to show somebody a three dimensional scene, without requiring them to wear stupid 3D glasses, you need to get a different image viewer's left and right eyes.The naive way: One way to do this is to build a robot that moves around behind a giant focusing screen, as shown below in the first applet. The robot places a light source at the focused image of the viewer's left eye (shown in red), and another light source at the focused image of the viewer's right eye (shown in green). As the viewer's moves, the robot tracks his position, always placing these two light sources at the right spot. Meanwhile, a computed image (seen in the black circle) figures out what the 3D object would look like as seen from each of the viewer's two eyes.
To shutter between the two images, an autostereo display would use either polarized light sources and a variably polarized screen, or else rapidly alternating light sources and a screen showing rapidly alternating images. Ideally, each of the viewer's eyes sees only one of the images. In the first demo below, the mechanical contraption does inverse kinematics to drive two rotational motors, to both rotate the arm and to contract/extend it.
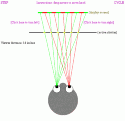
A better way: In practice, you wouldn't want to use a mechanical device for moving the lights around, because it would be way too slow to keep up seamlessly with head movement. That's why we're working on the approach demonstrated in the second applet below, an all-electronic light shutter . - Ken Perlin
Notice how the shutter lines get thinner as the user's head moves further away from the screen. Also notice how the shutter line spacing varies as the user turns his head to the side. You can learn about the principle behind this HERE.
We also have a 3D VRML simulation of this display,
as well as a
snapshot image of the VRML simulation.